
Picture this: it’s a busy Tuesday morning, the OT schedule is packed, and mid-procedure the image on the monitor turns grainy. The surgeon pauses. The nurse fiddles with the cable. Everyone in the room feels the seconds tick by. It’s a scenario that plays out more often than most hospitals like to admit — and more often than not, the root cause traces back to one thing: the endoscopy camera system.
Choosing an Endoscopy Camera System isn’t just a procurement task you hand off to whoever has the biggest budget line that quarter. It’s a decision that directly affects diagnostic accuracy, surgical confidence, and patient outcomes. And yet, for a lot of clinic owners, hospital administrators, and even some clinicians, the specifications sheet reads like a foreign language — pixels, lux, chip-on-tip, CCD versus CMOS, and so on.
This guide breaks it all down in plain language. Whether you’re setting up a new endoscopy suite, upgrading aging equipment, or simply trying to understand what your procurement team is evaluating, you’ll walk away knowing exactly what to look for — and what to avoid.
What Exactly is an Endoscopy Camera System?
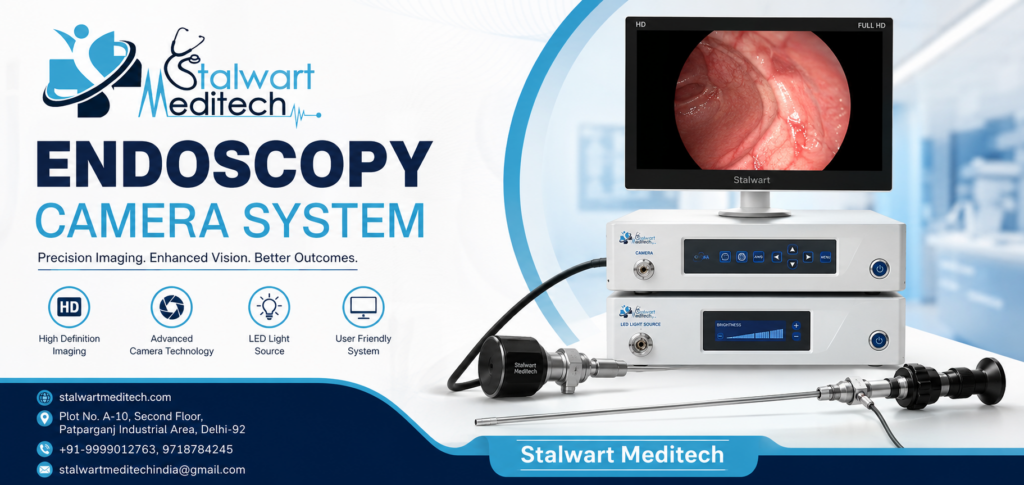
At its core, an endoscopy camera system is the set of components that lets a doctor see inside the human body in real time during a minimally invasive procedure. It typically includes a camera head (attached to the endoscope), a camera control unit (CCU) that processes the image, a light source, and a display monitor — all working together to give the surgical or diagnostic team a clear, live view of internal tissue. Think of it as the “eyes” of the entire procedure. A colonoscopy, a laparoscopic surgery, an ENT examination, a urology procedure — none of these work without a camera system that can deliver a sharp, accurately colored, well-lit image, often magnified many times over.
The quality of this system isn’t nice-to-have. It’s directly tied to how quickly and correctly a clinician can spot a polyp, identify a bleeding vessel, or navigate delicate anatomy. A poor camera system doesn’t just create inconvenience — it can genuinely compromise patient safety.
The Core Components, Explained Simply
Before comparing systems, it helps to know what you’re actually comparing. Here’s a quick breakdown of the main parts and why each one matters.
Table 1: Endoscopy Camera System — Key Components
| Component | What It Does | Why It Matters |
| Camera Head | Captures the raw visual data through the endoscope’s lens | Determines base image clarity and how well it handles close-up detail |
| Camera Control Unit (CCU) | Processes the signal and converts it into a usable image | Affects color accuracy, processing speed, and image stability |
| Light Source | Illuminates the internal cavity being examined | Poor lighting leads to shadows, missed findings, and eye strain |
| Monitor / Display | Shows the final image to the clinical team | A mismatched monitor can waste the benefits of a high-end camera |
| Cables & Connectors | Transmit signal between components | Weak connectors are a common, overlooked cause of image dropouts |
Note: Every component in the chain affects final image quality — a top-tier camera head paired with a weak CCU still produces a mediocre picture.
Key Features to Evaluate Before You Buy
Once you understand the building blocks, the next step is knowing which specifications actually move the needle for your use case. Not every feature matters equally for every specialty, but a few are near-universal priorities.
- Resolution (Full HD vs 4K): Higher resolution means finer detail, which is especially valuable in procedures where spotting subtle tissue changes matters — think early-stage lesion detection.
- Low-light performance: Internal cavities are dark environments. A camera that performs well only under bright light will struggle in real-world conditions.
- Chip type (CCD vs CMOS): CMOS sensors are generally more power-efficient and increasingly common in modern systems, while CCD sensors have traditionally offered excellent color accuracy — both have valid use cases.
- Compatibility with existing scopes: A camera system that doesn’t integrate with your current endoscopes means additional, often unnecessary, spending.
- Ergonomics and weight: Surgeons hold camera heads for extended periods; a bulky or poorly balanced unit causes fatigue and can affect precision.
- Sterilization compatibility: Confirm whether the camera head is autoclavable or requires cold sterilization, as this affects turnaround time between procedures.
- Recording and documentation features: Built-in image capture and video recording are increasingly essential for training, second opinions, and medico-legal documentation.
Table 2: Full HD vs 4K Endoscopy Camera Systems
| Factor | Full HD (1080p) | 4K Ultra HD |
| Image Detail | Good, suitable for most routine procedures | Excellent, ideal for fine detail and magnified views |
| Cost | Lower upfront investment | Higher upfront investment |
| Monitor Requirement | Works with standard HD monitors | Requires a compatible 4K display to see the benefit |
| Best Suited For | General surgery, routine diagnostics | Complex laparoscopic, urology, and specialized procedures |
| Storage Needs | Moderate | Higher, due to larger file sizes |
Note: 4K isn’t automatically “better” for every clinic — it’s better when the added detail translates into real clinical value for your specialty and case volume.
Step-by-Step: How to Choose the Right System
Selecting a camera system doesn’t have to feel overwhelming if you approach it methodically. Here’s a simple process that works whether you’re outfitting a single-room clinic or a multi-specialty hospital.
Table 3: Step-by-Step Buying Process
| Step | What to Do |
| 1. Define your use case | List the procedures you’ll perform most — general surgery, gynecology, urology, ENT — since specialty needs vary |
| 2. Audit existing equipment | Check what scopes, monitors, and towers you already own for compatibility |
| 3. Set a realistic budget | Include camera head, CCU, light source, monitor, cables, and installation costs |
| 4. Shortlist vendors | Look for manufacturers with strong after-sales support and spare-part availability |
| 5. Request a live demo | Test image clarity, color accuracy, and ergonomics with your own team before committing |
| 6. Check training & warranty | Confirm staff training, warranty period, and service response time are included |
| 7. Plan for future upgrades | Choose a system with modular parts so you can upgrade components later without replacing everything |
Note: Skipping the live demo step is one of the most common — and costly — mistakes buyers make.
Tips and Best Practices
- Always test the camera system with the actual scopes you’ll be using — compatibility on paper doesn’t always mean compatibility in practice.
- Ask vendors about mean time between failures (MTBF) data rather than relying only on marketing claims.
- Train your entire team, not just the lead surgeon — nurses and technicians handle the equipment daily and need to know its quirks.
- Budget for annual calibration and maintenance, not just the initial purchase.
- Keep a backup light source cable on hand — it’s one of the most frequently damaged, and cheapest, components to replace.
Common Mistakes to Avoid
Table 4: Do’s and Don’ts When Choosing an Endoscopy Camera System
| Do | Don’t |
| Match resolution to your monitor | Buy a 4K camera and keep an old HD monitor — you’ll never see the difference |
| Involve clinicians in the decision | Let procurement decide based on price alone |
| Check spare parts availability locally | Assume every vendor offers quick regional support |
| Factor in total cost of ownership | Focus only on the upfront purchase price |
| Request references from similar facilities | Rely solely on vendor brochures and demos |
Note: Most buyer regret comes from mismatched components, not from choosing the “wrong brand.”
Frequently Asked Questions
1. What is the average lifespan of an endoscopy camera system?
With proper maintenance, most systems last 5–8 years before major components need replacement, though camera heads with heavy daily use may need earlier servicing.
2. Is 4K really necessary for every clinic?
Not always. General practice and routine diagnostics often do well with Full HD, while specialties requiring fine tissue differentiation benefit more from 4K.
3. Can I use a new camera head with my old endoscopes?
Sometimes, but not always. Compatibility depends on connector type and signal protocol — always confirm with the manufacturer before purchasing.
4. How much does an endoscopy camera system typically cost?
Costs vary widely based on resolution, brand, and included components, ranging from budget-friendly entry-level setups to premium 4K systems with advanced documentation features. It’s best to request a tailored quote based on your specific needs.
5. What’s the difference between CCD and CMOS sensors?
CCD sensors are known for strong color accuracy, while CMOS sensors tend to be more energy-efficient and are widely used in newer systems. Both can deliver excellent image quality depending on design and implementation.
6. How often should the camera system be serviced?
Most manufacturers recommend annual calibration checks, with more frequent inspections for high-volume facilities to catch wear and tear early.
Final Thoughts
Choosing the right endoscopy camera system isn’t about chasing the highest spec sheet or the flashiest marketing pitch — it’s about matching the system to your actual clinical needs, existing equipment, and long-term maintenance realities. A well-chosen system quietly does its job procedure after procedure, giving your team the clarity and confidence they need without a second thought. A poorly chosen one becomes a recurring headache, both for your staff and, potentially, for patient outcomes.
At Stalwart Meditech, we work with clinics and hospitals every day to help them navigate exactly this decision — matching real-world use cases with the right combination of camera head, light source, and display technology. If you’re currently evaluating options or simply want a second opinion on a quote you’ve received, we’re happy to walk through it with you.
Visit: https://stalwartmeditech.com/contact-us/
Call: +91-9999012763, 9718784245
Email: stalwartmeditechindia@gmail.com
Address: Plot No. A-10, Second Floor, Patparganj Industrial Area, Delhi-92,
Address -: 4/2544, Street No.-11, Main Road, Govardhan Behari Colony, Shahdra, Delhi-32